Gas Welding Aluminum
Aluminum is everywhere, which means that the potential need to repair it is also abundant. Indeed, I’ve made countless aluminum repairs – from boat props to storm doors; from a housing bracket under the hood of my truck to the extension latter in my garage. I’ve done more aluminum repairs than I care to admit. But, I do find solace in not having to rely on someone else for repairs or replacement parts to come through. Throughout my years of welding at trade shows I’ve discovered I’m not alone. Countless people have approached me wanting to know how to make aluminum repairs with their oxy-fuel setup, so I would share with them some of the techniques, tips and tricks that I employ. This article is simply an extension of those efforts.
Safety first
For those who are new to the field of welding I’d like spend a few words discussing an all important topic - safety. Working with electricity is dangerous if you haven’t educated yourself in the proper practices and procedures. Working with combustible gases and fire is no different. 1) Be sure to read and adhere to the manufacturer’s instructions for the equipment you are using. 2) Be mindful of your working environment. Saving $200 in repair fees by doing it yourself is a good feeling; shelling out a few thousand (or worse) because you failed to notice the bottle of paint thinner beside your welding bench won’t be. Make sure you have a validated multi-purpose fire extinguisher (Type ABC) close by. I’ve used my torches in a variety of settings and in a number of ways and I am fortunate enough to have never needed the extinguisher, but I still keep it close at all times. 3) Keep in mind that toxic fumes can be just as dangerous to your health as the fire itself. Be sure to take the necessary precautions - which include welding in a well ventilated area.
General tool considerations
Next up: a few general points on welding aluminum with an oxy-fuel torch. In my garage I have two oxy-fuel torch types [see fig a]. One is a conventional Victor-Style medium duty combo torch that was passed down to me – not sure of the brand as it was well used before I got a hold of it. The other is a DHC2000 manufactured by Detroit Torch and Mfg. Co. that I picked up a few years back. Each type has its own set of strengths and weaknesses that may make it more preferable to the other for a given application.
Welding aluminum with the conventional torch has proven to be a little tricky for me in the past – I’d end up blowing through the molten weld pool. I’ve been told that using hydrogen in place of acetylene provides more control and better visibility of the weld puddle. That may be so, but I don’t weld enough aluminum to justify spending the extra dollars on a separate hydrogen cylinder, regulator, and hose. So, for this project instead of swapping out my fuel I’ll swap out my torch. Compared to my conventional torch the DHC 2000 seems to offer a softer and more concentrated flame and, for me at least, has proven to be easier to use when welding certain metals like stainless and aluminum. I should note that a drawback of the DHC 2000’s more concentrated flame is that it is limited to welding small – medium size projects and materials no thicker than 3/8.” Fortunately, most of my projects around the shop and most all shops fall within its range.
Other required tools & materials
Welding aluminum with any oxy-fuel torch requires the use of flux. The flux’s primary job is to prevent oxides from forming in the weld puddle. It also helps to keep the weld free of contaminates and facilitate flow of the filler metal. The burning flux results in an orange sodium flare that makes seeing the weld puddle difficult. To improve visibility of the molten puddle (and protect your eyes) a shade 5 green or Shade 6 cobalt blue lens is often used. The cobalt blue lenses aren’t cheap, but they are effective at reducing the orange sodium flare ($65-$200). I use the cobalt blue glasses (shade 6; ANSI 287.1) from Detroit Torch and Mfg. Co. Other materials that may prove useful include: a homemade flux tray, a stainless-steel-bristle brush, a pair of pliers or something to hold and/or move the work piece, and of course appropriate attire. [see fig b]
Rod & flux
Before you start welding, you need to find yourself the appropriate welding rod. I tend to reach for the TIG rod because it is easy to find and its high purity makes for a higher quality weld. However, it’s worth mentioning that many prefer to use flux-core aluminum welding rod as it negates having to mix up and apply a separate flux. [see fig c] A downside to the flux-core is that it can be tougher to find and a lot more expensive. Beyond that, aluminum tig rod comes in a variety of types and diameters and can easily be found at your local welding supply store. I’ve found that type 1100 or 4043 will work well for most applications I encounter. The 1100 has properties that make it suitable for “soft” applications where bending or shaping of metal will occur, like auto body work. At the other end 4043 works well for “hard” applications where the base metal is not intended to flex. Some examples of this might be cast aluminum or Aluminum angle. Selecting rod diameter is more of guessing game. I usually like to start with ø1/16” rod and move up or down in size as needed.
With the rod selected, now is a good time to move onto the flux. Aluminum begins to oxide as soon as it leaves the mill. As was mentioned above, the primary purpose of flux is to overcome the oxide layer on the surface of your base material and filler material to make it possible to weld the material. There are a few different brands and types that will work but the stuff I use is aluminum powdered brazing flux by Harris. To mix the flux I simply: a) pour a small amount of the powder into the tray; b) tray pic here dip my fingers into some water and shake the water off my fingertips into the powder – that is literally all you need; c) use my rod to mix the flux until it has a paste-like consistency. If the flux is too runny or too thick you will have some trouble getting good coverage on the rod when you go to coat it which can result in a poor weld.
Weld preparation and setup
A key to having a good weld is making sure that the surface or your workpiece is clear of possible contaminants like dirt, grease, etc. The flux will aid in mitigating some of the contaminants but it is still a good idea to run a stainless steel wire brush along the area to be welded and then using a clean rag to wipe the surface. When joining materials over ¼” thick it may also be necessary to bevel the edges to allow for better weld penetration. [see fig d]
While material thickness of the work piece may be your first consideration you also need to take the following into account: size of the part being welded; the pace at which you lay the bead, the amount of heat needed, and anything that can act as a heat sink. On this last point, something that is often overlooked is the work surface. If a work piece is flat and lying directly on a metal bench top, the top will act as a heat sink and pull heat away from the part. This can be especially problematic in welding aluminum. Much like copper, aluminum has a high thermal conductivity which means that the heat tends to move away from the weld zone fairly quickly. The more you do to keep this distribution of heat at bay the better off you will be. Some tips include preheating the whole work piece and resting it atop of firebricks during repair.
Procedure for repair
Now that your materials, work piece, and work area are prepared it’s time to select the appropriate tip size and light your torch. This should be done in accordance with the manufacturer’s instructions.
1) Once the torch is lit you will need to establish a flame that is “just-off-feather”. I call that a soft flame. [see fig e]
2) Slightly preheat the whole work piece, (500-600 degrees) especially for thicker or larger parts. A old welders trick to get close to this temp is to use a acetylene flame only and pass your torch over the part to be welded. This will leave a black carbon coating on the surface. Now go back to your soft neutral flame and heat part to be welded until black color disappears. This will put your part to be welded at around 500 degrees.
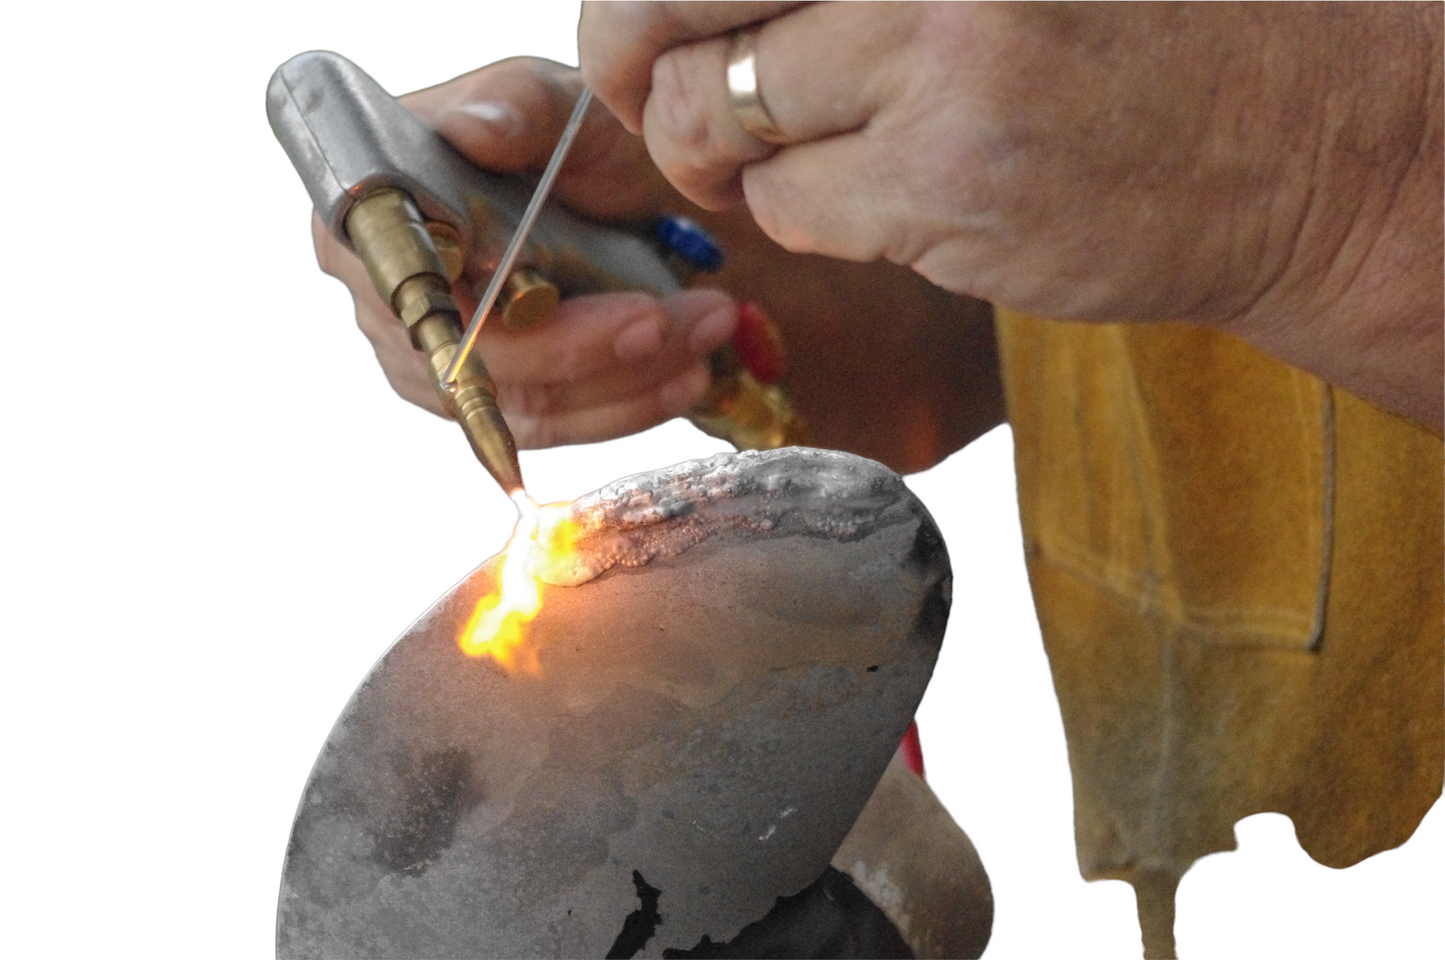
3) Unlike with other metals there is no change in color when aluminum is heated to its welding temp (1250°f.) However, just before the puddle forms the metal does take on a more “shiny” appearance. When the puddle does form it will appear “wrinkled.” [See fig f]
4) The moment the puddle emerges, quickly dip your rod in the puddle and pull it back out. Hint: let the rod hover just above the puddle, still inside your secondary flame.
5) Advance the flame and the rod along the work piece. Adjust your speed as needed. As the heat begins to build up in the work piece you will need to pick up the pace to keep from “blowing through.” You can also control the heat by periodically pulling the torch back an inch or so away from the part, giving it time to cool before advancing.
6) Repeat steps 4-5 until you near the end of the weld. As you near the end of the weld, you will need to pull the flame back away from the weld to keep the aluminum from “falling out.”
7) Once the complete weld bead is laid, let it cool before examining it. Here are some things you may look for as you examine the weld:
- Is there adequate/full penetration through the work piece?
- Is there too much build-up?
- Do there appear to be any defects in the weld (cracks, holes, etc.)?
The ability to do any type of welding on any type of material takes practice. The ability to become a good welder takes a fair amount of practice. Good luck and have patience, you will master it.
