
1. Safety First
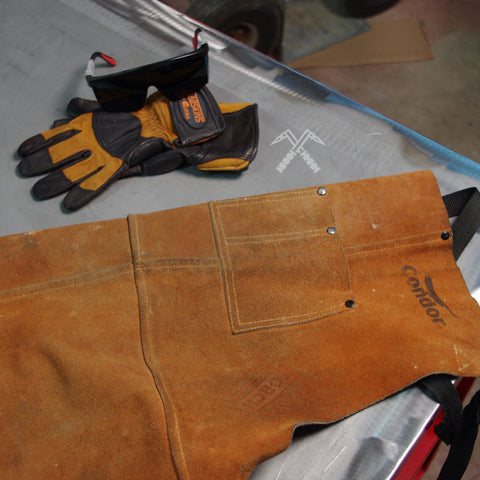
As with most any job, safety is paramount and gas welding is no different. Basic protection should be worn at all times.
- Protective eye wear (shade 5 lens for gas welding)
- Leather Gloves – metal is hot and sharp after welding and cutting.
- Long sleeve shirt – Leather, denim or heavy woven work shirt
- Long pants and closed toes shoes – sparks will fly. They cool quickly but definitely leave a mark on your skin. Keep your bare skin covered.
Fire Extinguisher - You are playing with fire and molten, hot metal, keep a fire extinguisher nearby at all times and always make sure it is charged!
Work Area – Just because your body is protected, that doesn’t mean the work space around you is protected. When welding and cutting, sparks can easily fly outside your immediate project area. Be mindful of your surroundings, such as, where your tanks are located, where your hoses are reaching across and any materials that may be flammable around your project area. Also be mindful of who and where someone may enter your work area.
2. Locate your Local Gas Supply
Make Friends – The employees at your local gas welding and supply store are usually friendly and more than willing to answer questions. Believe it or not, the internet does not have all the answers and most often they can point you in the right direction.
Get Some Gas – Your local gas supply will usually carry all the basic tools you need, along with a point of purchase for the different types of gases and filler rods needed. You can rent or buy gas tanks, the salesman will help you determine the best options for the amount of work you plan on doing. We find that most often, for the occasional weekend warrior, rented tanks seem to be the most cost effective.
3. Buy a Welder
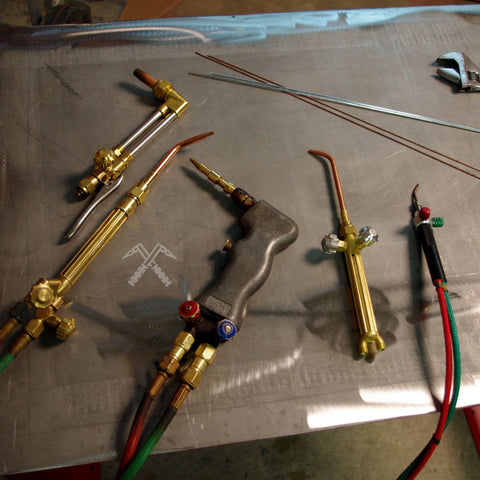
Now that you have made it as far as the welding supply store, what type of welding machine do I need? We find the most approachable way into welding is to try conventional oxy-acetylene. Although newer electric technology has dominated the market in recent years one of the most cost effective ways to get started is with a classic cutting and welding torch. The entry level electric machines often run between $1000 and $2000. Now that’s a lot of hard earned money to fix a broken bracket or busted leg on a chair.
As with any welder you will need some type of filler rod. We find a standard 36” TIG rod found at your local welding supply store works best when gas welding with a torch. Select a filler rod that matches with your base material.
Gas welding kits usually cost $250-$500 and can often be found with everything you need to get started such as goggles, regulators and hose. Tanks are almost always sold separate unless you get the mini tote tanks. The other major benefit to a gas welding torch kit is you almost always get the cutting attachments with the kit. This avoids the need for a mig or tig machine and a plasma cutter, if any work was to require cutting of metal.
Some of you may even have an old gas torch in your garage or and older family member’s garage and didn’t even know you can weld with it. With a little practice you can even weld non-ferrous materials like aluminum or other tricky metals like stainless and cast iron.
4. Practice Makes Perfect
Once you have your gas welding torch and tanks to fuel the torch you are ready to spark it up. It can never be stressed enough, practice, practice, practice! Find some scrap metal of a similar material to your project and practice adjusting the flame on your torch to determine how much heat is needed to melt the base metal. Once you have dialed in your flame start introducing your filler rod to the molten weld puddle. When you are comfortable, give that project around the house a shot. Most small welding projects can be cut, touched up with a grinder and re-welded, so don’t worry about making mistakes.
5. It Ain’t Always Pretty
The welding community can be very critical of other people’s welds. It is important to remember that just because you don’t have perfectly ‘stacked dimes’ your weld is not a failure. Most pictures you see online are of people who weld for a living 8 hours a day. That’s not the average guy and that’s not what is always needed to get the job done. Many welding applications often see grinding and sanding of the welds anyway. Good penetration is what really matters!
If you like the content you just read and want to learn more, be sure to check back often or follow us on social media for more detailed instructions and tips about welding with oxygen and acetylene. Interested in getting a torch for yourself? Click Here - DHC2000